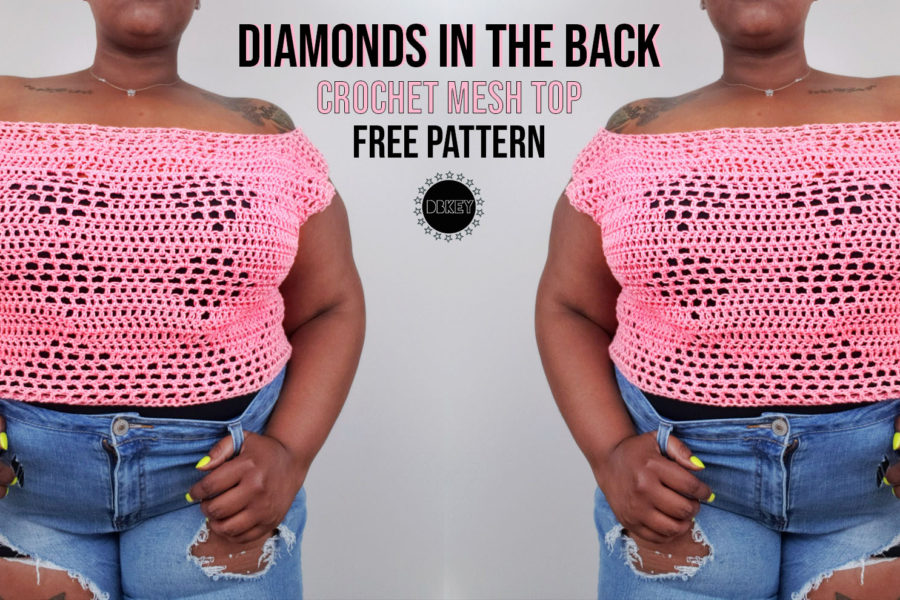
A light and airy piece — The Diamonds in the Back Crochet Mesh Top. Keep reading if you’d like to know more about how this piece came about or just scroll down and get right to the free pattern.
Hey ya’ll! It’s hot again. If you’re anywhere near Georgia, then you know Spring lasted about a week this year, am I right?! But warm weather means that I can wear and make all the cottony and crochet mesh things and I love it. I always like to have an airy top that I can throw on and not only be cute, but also not pass out from heat exhaustion. It’s been a while since I’ve designed anything, let alone a top, using filet crochet so I figured I’d give it a shot.

Some people get a little intimidated when it comes to filet crochet because it uses a graph, but I promise you you can do it. This pattern uses only double crochet stitches to create the mesh effect and the diamond design, yes only DOUBLE CROCHET stitches. So believe me when I say, you’ve got this.
Okay so I’ve got the design, and now on to the yarn. The first time around, I tried to make this top using Hobby Lobby’s I Love This Cotton, which is my faaaavorite 100% cotton yarn right now btw, but it felt way too bulky for my liking. So after frogging that, and calming my nerves with some coffee and a Netflix episode, I decided to dive back into my stash and see what magic was inside. I ended up finding some Sinfonia Cotton Yarn that I had purchased a while back to test a pattern with, but I ended up not using all of it. SCORE!! The Sinfonia Cotton Yarn is a DK weight yarn, which is perfect for garments that need to drape a little. It is also mercerized which gives it a softness as well as a great sheen.

Now if you’re new to the world of filet crochet, don’t worry, I promise it’s easy to learn the technique and you’ll be off to creating beautiful pieces in no time. If you need a little help click here to read my Filet Crochet: The Basics post. This will not only help you with this project, but with any other filet crochet project you take on.
Design? Check. Yarn? Check. So let’s get into it….
The Pattern
CLICK HERE to pin for later…
Finished Size:
- Bust: 32 (36, 40, 44, 48)”
- Note: This garment was designed to fit true to size. Please take this into consideration when choosing your size.
- To determine the column number, use the numbers across the bottom of the chart provided.
Materials
- I/5.25 crochet hook
- Scissors
- Yarn Needle
- Measuring Tape
Abbreviations
Ch – Chain
St – Stitch
Dc – Double crochet
Rep – Repeat
Gauge
4 inch square = Single crochet foundation 19 + 6 rows tall + 9 spaces wide
Start here…
MAKE 2
Row 1: Single crochet foundation chain (79). Turn.
Row 2-3: Ch 4 (counts as dc + ch 1). Skip next st. Dc in next st. *Ch 1. Skip next st. Dc in next st. Rep from * to end of row. Turn.
Row 4-30: Start graph. Left handers: Start working chart at the most bottom left block for your size. Right handers: Start working chart at the most bottom right box for your size. Be sure to turn your work after Row 30.
- Size Small – Work columns 7 – 33
- Size Medium – Work columns 6 – 34
- Size Large – Work columns 5 – 35
- Size XL – Work columns 3 – 37
- Size XXL – Work columns 1 – 39

Shoulder
Row 31: Ch 4. Dc in next st. *Ch 1. DC in next st. Rep from * until 3(4, 5, 6, 7) boxes are worked. Turn.
Rows 32-33: Ch 4. Dc in next st. *Ch 1. DC in next st. Rep from * until end of row.
Fasten off.
Assembly
- All assembly is done using a whip stitch.
- With RS facing each other, use yarn to seam the side of the front panel to the back panel leaving an armhole depth of 7 (8, 9, 10, 11) inches.
- Seam the shoulder pieces across the top.
- Sew in all yarn ends from assembly, and any also any other loose ends.
HAPPY HOOKING!
I would absolutely love to see your how your project turned out! Share your finished work with me on Instagram!
@designsbykey
#dbkeypatterns


