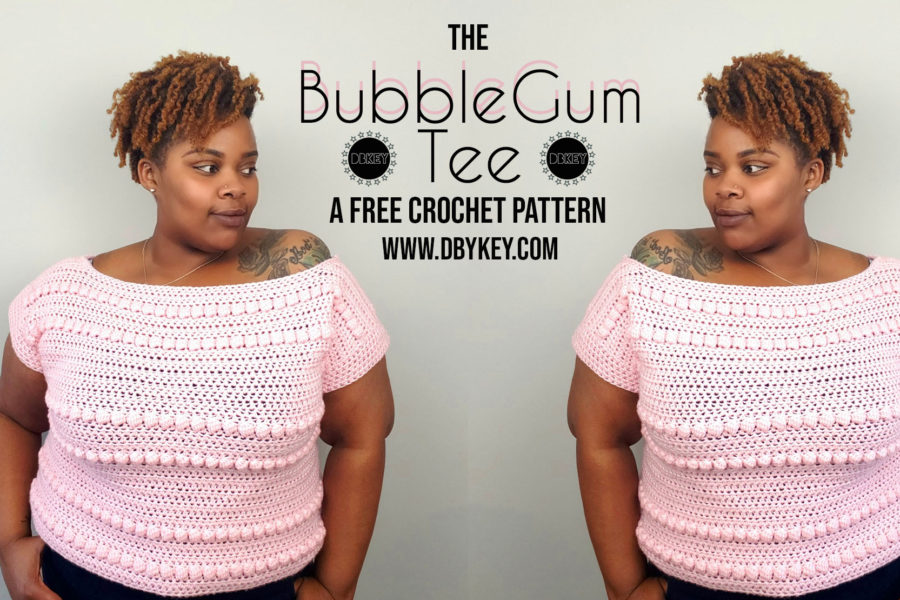
A cute basic tee with some fun texture — the Bubblegum Tee. If you’d like to know more about how this crochet tee came to be, keep reading. Or scroll down to get right to the free pattern!
This post may contain affiliate links.

This year in Georgia, Winter has basically been non-existent. Since it hasn’t been cold enough for sweaters, I haven’t made many this season. Although I LOVE winter makes, I have to say that I have been enjoying this mid 70’s weather. Now that the winter season is winding down, I think it’s safe to say that it’s time for all the Springtime makes.
I’m a sucker for a nice and simple top, and the Bubblegum Tee is just that. The Bubblegum tee is a fun off the shoulder short sleeved top featuring bobbles in all the right places to give the top some extra pop! Although it may look a little complicated, I promise making this top is easier than it seems. With repetitive stitches and rows, it makes it the perfect project for crocheting and watching your favorite Netflix show.

The Yarn
I’ve been crocheting for a while now, and I can definitely say that I’ve put in enough time to become a yarn snob. I’m particularly selective when it comes to acrylic yarn. As you know, my go to acrylic yarn is I Love This Yarn by Hobby Lobby stores, but I recently took a trip to Joanne’s and decided to try something different. For this crochet tee, I used Basic Stitch by Lion Brand Yarns in the color opal. Being that it’s February, I couldn’t resist grabbing the pinkiest pink I could find. I’ve heard good things about this yarn and I can now say for myself how much I love it! It is a worsted weight premium acrylic that has a vibrant color, and is also soft to the touch. The best thing about this yarn is that it doesn’t get frizzy after working with a project for a while, and that’s a huge plus for me.

The Bubblegum Tee Crochet Pattern
- Get the printer friendly, ad free PDF version of the pattern here.
- CLICK HERE to pin for later
- CLICK HERE to fave on Ravelry
Materials
- J/6.00 mm crochet hook
- Approx. 800 – 950 yards depending on size
- Sample made with Basic Stitch by Lion Brand
- Scissors
- Stitch Markers
- Your favorite show to “watch”
- Tapestry Needle
Gauge
- 4-inch square = 13 sts wide x 10 rows tall of hdc
Finished Size
- Bust – 36 (40, 44, 48, 52, 56, 60, 64)”
- Length – 20 (20, 20.5, 21, 21, 21.5, 21.5, 22)”
Abbreviations
- Fhdc – foundation half double crochet
- Ch – chain
- Sc -single crochet
- Hdc – half double crochet
- St – stitch
- Sts – stitches
- Rep – repeat
- Bbl – bobble
- Dec – decrease
- Rs – right side
- Sl st – slip stitch
- Rnds – rounds
Pattern Notes
- The pattern is written for S size with M, L, XL, 2XL, 3XL, 4XL, and 5XL in parentheses. Not all rows are the same for every size. Be sure to follow instructions for the size you’re making.
- This pattern is worked in panels from the bottom up.
- Ch 2 does not count as a stitch.
- For longer tee, continue with panel row repeat until desired length.
Special Stitches
- Dec – half double crochet 2 together
- Bbl – [Yarn over, insert hook into st, yarn over, pull up a loop, yarn over, draw through 2 loops] 5 times into the same stitch, yarn over, draw through all 6 loops on hook.
Start Here…
Front Panel
Row 1: Fhdc 59(65, 71, 77, 85, 91, 97, 104)
Rows 2-5: Ch 2. Hdc across. Turn.
Row 6: Ch 2. Hdc in next 2 sts. *Bbl in next st. Sc in next st; Rep from * until 2 sts left. Hdc in last 2 sts. Turn
Rows 7-11: Rep row 2.
Row 12: Rep row 6.
FOLLOW PATTERN FOR YOUR CORRESPONDING SIZE.
Rows 13-20(20, 21, 23, 23, 24, 24, 25): Rep row 2.
Rows 21-35 (21-35, 22-37, 24-38, 24-38, 25-40, 25-40, 26-42) : Rep rows 6-20 (6-20, 6-21, 6-23, 6-23, 6-24, 6-24, 6-25).
Next Steps (All sizes): Rep rows 6-12.
Next Steps con’t (All sizes): Rep row 2 until you reach row 42(42, 44, 45, 45, 47, 47, 49).
DO NOT FASTEN OFF. PROCEED TO SHOULDER SECTION.
Shoulder section
Place a st marker in the 15th (15th, 16th, 17th, 17th, 18th, 18th, 19th) st from each end of the panel to mark the shoulder sections.
Step 1: Ch 2. Hdc in the next 15(15,16,17, 17, 18, 18, 19) sts. Turn.
Step 2: Ch 1. Sk 1st st. Hdc in next 14(14, 15, 16, 16, 17, 17, 18) sts. Turn.
Step 3: Ch 1. Hdc in next 12(12, 13, 14, 14, 15, 15, 16) sts. Dec.
Fasten off. Cut yarn and leave long tail for seaming.
Attach yarn to the marked st for the other shoulder section.
Step 4: Ch 2. Hdc in the next 15(15, 16, 17, 17, 18, 18, 19) sts. Turn.
Step 5: Ch 2. Hdc in next 13(13, 14, 15, 15, 16, 16, 17) sts. Dec. Turn.
Step 6: Ch 1. Sk 1st st. Hdc in next 12(12, 13, 14, 14, 15, 15, 16) sts.
Fasten off. Cut yarn and leave long tail for seaming.
Back Panel
Row 1: Fhdc 59(65, 71, 77, 85, 91, 97, 104)
Rows 2-42(42, 44, 45, 45, 47, 47, 49): Ch 2. Hdc across. Turn.
Next Steps: Rep steps for front panel shoulder section.
Assembly
- Assembly is done with a sl st. Feel free to use your preferred method.
- Lay panels with RS facing each other.
- Seam front panel to back panel across the shoulder sections only.
- Seam front panel to back panel leaving an armhole depth of 7(7.5, 8, 8.5, 9, 9.5, 10, 10.5) inches.
- Turn project right side out and proceed to the neckline.
Neckline
Attach yarn to shoulder seam closest to the neckline. *Ch 1. Sc around neckline evenly. Sl st to 1st st; Rep from * until you’ve worked 2 rnds of sc. Fasten off.
Sleeves
Attach yarn to top of side seam. *Ch 2. Hdc around armhole evenly (approx 1 st per row). Sl st to 1st st; Rep from * until you’ve worked 5 rnds of hdc. Fasten off. Rep for other armhole.
Weave in all ends.
HAPPY HOOKING!
I would absolutely love to see how your project turned out! Share your finished work with me on Instagram!
@designsbykey
#dbkeypatterns


