It’s Summertime again, which means it’s time to break out the cotton yarn! And first up we have the Endless Summer Tank – the latest free crochet pattern from Designs by Key. If you’d like to know more about how this crochet tank top came to be, keep reading! Or scroll down to get right to the free pattern!
This post may contain affiliate links.

PIN NOW, MAKE LATER
You can find the printer friendly PDF in my Ravelry Shop or in the DBKey Shop. The ad free PDF version of this pattern contains a 6-page full color pattern with row by row instructions.
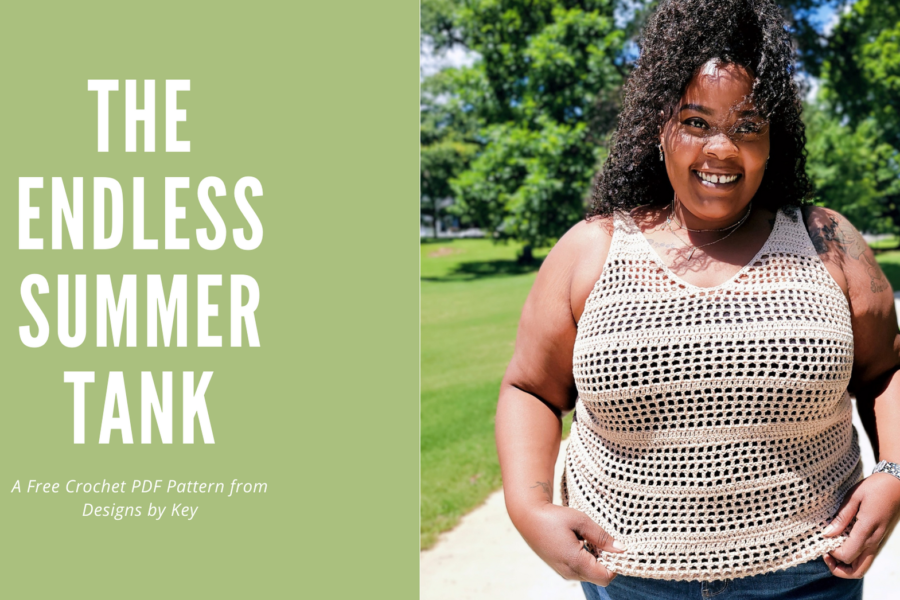
Say hello to your new favorite crochet tank top – the Endless Summer Tank. Cool and breezy, this crochet tank top will definitely be your best friend this season.

Beginner Friendly…
The Endless Summer Tank is made up of double crochet stitches coupled with chain spaces to create a beautiful light and airy mesh design that is sure to keep you cool this Summer. This crochet tank features a gorgeous feminine neckline to give you the extra sass you need.
The mesh stitching of this crochet top makes it the perfect choice for beach or pool days, but because of the shaping of this top, it can also be worn dressed up with a nice skirt and heels. The possibilities are endless!

The Yarn from WeCrochet
These days, it seems as if after every project I complete, I come out on the other end with a new favorite yarn. This time is no different. For this crochet tank top, I got the opportunity to crochet with Cotlin yarn from WeCrochet, and let me tell you, it stood up to the hype. But I mean, I haven’t purchased a yarn from WeCrochet that I didn’t end up loving (knocks on wood), so I wasn’t shocked at all. Let me give you the deets.
Cotlin is made from 70% tanguis cotton and 30% linen, which makes it the perfect yarn for summer garments. I know what you’re thinking…what the heck is tanguis right? Don’t worry, I had the same question. Tanguis (tan-gwiss) cotton is very soft and has excellent absorption, hence the reason it’s great for warm weather. This type of cotton is a naturally white fiber, which makes it an excellent candidate for dyes. The linen that is added to the yarn just makes it that much better. The Belgian linen adds additional absorbency with low elasticity which means your work won’t stretch out! On top of being durable and functional, it is also affordable. Coming in at $4.99 a skein, you definitely want to get your hands on some this Summer. The Endless Summer Tank uses 4-6 skeins of Cotlin depending on your size and gauge. So go ahead and pick out your color and get started on the crochet tank of your dreams!
Have you seen the Hooker Tee…
Yarn Subs
Can’t get your hands on any Cotlin yarn from WeCrochet? No worries! This crochet tank is very versatile and can be made with any dk weight cotton/cotton blend yarn!
The Endless Summer Tank Crochet Pattern
- Get the printer friendly, ad free PDF version of the pattern here.
- CLICK HERE to pin for later
- CLICK HERE to fave on Ravelry
Materials
- G/4.00 mm crochet hook
- Dk weight cotton/cotton blend yarn
- Scissors
- Stitch Markers
- Tapestry Needle
- Your favorite show to “watch”
Gauge
- 4 inch square = 17 sts x 10 rows measured over dc.
Finished Size
- Bust – 30 (34, 38, 42, 46) (50, 54, 58, 62)”
- XS (S, M, L, XL) (2XL, 3XL, 4XL, 5XL)
Abbreviations
- fdc – foundation double crochet
- ch – chain
- sk – skip
- st – stitch
- sts – stitches
- sc – single crochet
- dc – double crochet
- sl st – slip stitch
- ch-sp – chain space
- t-ch – turning chain
- rep – repeat
- dc3tog – double crochet 3 together
- dc2tog – double crochet 2 together
- rs – right side
Pattern Notes
- The pattern is written in nine sizes as follows: XS (S, M, L, XL) (2X, 3X, 4X, 5X). Make sure to follow the numbers for your size only.
- The pattern is made from two panels from the bottom up.
- Ch 2 does not count as a stitch.
- Ch 3 counts as a stitch.
- Ch 4 counts as a double crochet plus ch 1.
Special Stitches
- Foundation Double Crochet (fdc). For more help with this stitch, click here.
Start Here…
Panel (Make 2)
Row 1 (RS): Fdc 63 (73, 81, 89, 97) (107, 115, 123, 131). Turn.
Row 2: Ch 4, *sk next st, dc in next st, ch 1; rep from * to last 2 sts, sk next st, dc in last st. Turn.
Row 3: Ch 4, *sk ch-1 sp, dc in next st, ch 1; rep from * to last 2 sts, sk ch-1 sp, dc in 3rd ch of t-ch. Turn.
Rows 4-6: Rep row 3.
Row 7: Ch 2, dc in first st, *dc in ch-1 sp, dc in next st; rep from * to last 2 sts, dc in ch-1 sp, dc in 3rd ch of t-ch. Turn.
Row 8: Ch 2, dc across. Turn.
Row 9: Rep row 2.
Rows 10-13: Rep row 3.
Row 14: Rep row 7.
Row 15: Rep row 2.
Rows 16-19: Rep row 3.
Rows 20-32: Rep rows 7-19.
Rows 33-34: Ch 1, sk first st, dc3tog, dc across to last 4 sts, dc3tog. Turn.
Row 35: Rep row 2.
Row 36: Ch 2, dc in first st, ch 1, sk (ch-1 sp, dc, ch-1 sp), dc in next st, *ch 1, sk ch-1 sp, dc in next st; rep from * to last 4 sts, ch 1, sk (ch-1 sp, dc, ch-1 sp), dc in last st. Turn.
Rows 37-39: Rep row 36. 39 (49, 57, 65, 73) (79, 91, 99, 107) sts
V-Neck Section
Place st marker 20 (25, 29, 33, 37) (40, 46, 50, 54) sts in from end of row. This st will remain unworked.
Row 40: Ch 1, sk first st, dc3tog, dc in next 11 (17, 21, 25, 29) (31, 37, 41, 45) sts. Dc3tog. Turn. 13 (19, 23, 27, 31) (33, 39, 43, 47) sts
Row 41: Rep row 2.
Rows 42-45: rep row 36.
Row 46: Ch 1, sk first st, dc2tog, dc across to last 3 sts, dc3tog. Turn.
Row 47: Ch 2, dc across. Turn.
Rows 48-49: Ch 1, sk first st, dc across to last 2 sts, dc2tog. Turn.
Row 50: Ch 2, dc across. Turn.
Row 51: Rep row 48.
Rows 52-57: Rep row 50.
Fasten off.
Next Steps: Attach yarn to opposite end of row 39, rep rows 40-57.
Fasten off.
Blocking
- For best results, block each piece separately to size specific measurements before seaming.
Assembly
- All assembly is done with a tapestry needle using the whip stitch. Feel free to use your preferred method of seaming.
- Layout panels with rs facing each other. Use stitch markers to keep panels aligned.
- Seam the top panel to the bottom panel across the shoulder section only. Fasten off and cut yarn. Complete on the opposite side.
- Seam top panel to bottom panel from the stitch marker, down the side of the panel. Fasten off and cut yarn. Complete on the opposite side.
Edging
Neckline Edging
With rs facing upward, attach yarn to inside shoulder seam near the neckline.
Rnd 1: Ch 1, sc evenly around the neckline, sl st to first st.
Fasten off.
Armhole edging
With rs facing upward, attach yarn to bottom of the armhole (near top of side seam). Complete this step for both armholes.
Rnd 1: Ch 1, sc evenly around armhole, sl st to first st.
Fasten off.
Weave in all ends.
